
How to Calculate Fence Materials
Before you buy a single post or panel, doing the math up front saves you from mid-project hardware store runs — and from over-ordering materials you’ll never use. Here’s how to work out exactly what you need.
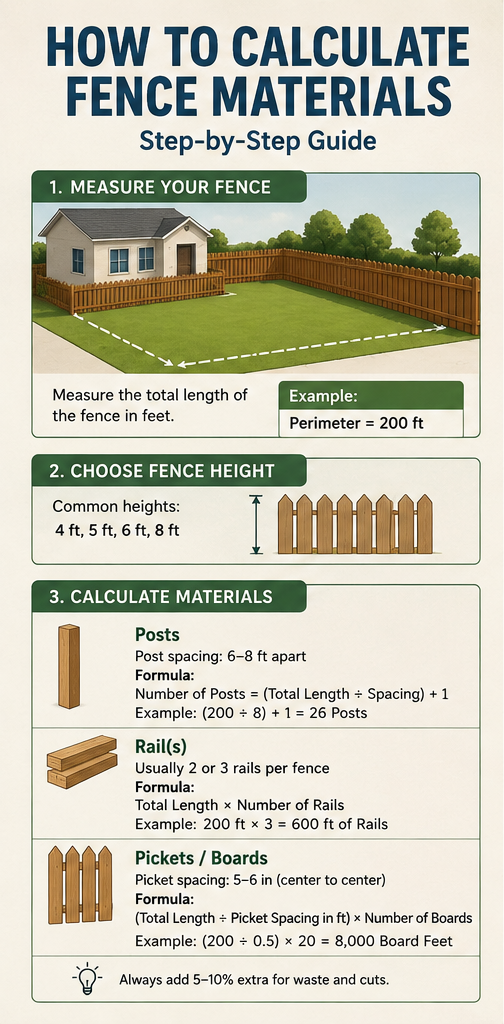
Step 1: Measure Your Fence Line
Start by measuring the total perimeter you want to fence.
- Walk the property line with a tape measure or measuring wheel, or use a site plan/survey if you have one.
- Break the line into straight segments (each side of a rectangle, each angle change) and measure each separately.
- Add the segments together for your total linear footage.
- Note any gates you’ll need — measure their width separately since gate hardware is calculated differently from fence panels.
Example: A backyard with sides of 60 ft, 40 ft, 60 ft, and 40 ft (with a 4 ft gate on one side) = 200 ft total, with 196 ft of actual fencing and one 4 ft gate opening.
Step 2: Calculate Posts
Posts are the backbone of the fence, so getting this number right matters most.
Formula:
Number of posts = (Total linear feet ÷ Post spacing) + 1- Standard post spacing is 8 feet for wood fences, but ranges from 6–8 ft depending on the fence style and local wind/soil conditions. Vinyl and chain-link often use 8–10 ft spacing; check your specific product’s spec sheet.
- Add 1 extra post for the “closing” end of each straight run.
- Add extra posts for corners (each corner needs its own post — count corners separately if your layout isn’t a simple rectangle) and for both sides of a gate opening (gate posts are usually sized heavier than line posts).
Example: 196 ft of fence ÷ 8 ft spacing = 24.5 → round up to 25, + 1 = 26 posts, plus 2 dedicated gate posts = 28 posts total.
Always round up, never down — a partial post gap means a redesign.
Step 3: Calculate Rails (Horizontal Framing)
Rails run horizontally between posts and support the pickets or panels.
Formula:
Number of rails = Number of post sections × Rails per section- A “section” is the gap between two consecutive posts.
- Number of sections = Number of posts − 1 (for a straight run) or equal to the number of post gaps in your layout.
- Rails per section depends on fence height: typically 2 rails (top/bottom) for fences under 5 ft, and 3 rails for privacy fences 6 ft or taller, to prevent sagging.
- Standard rail lumber comes in 8, 10, 12, or 16 ft lengths — match rail length to your post spacing to minimize waste and splicing.
Step 4: Calculate Pickets or Panels
This depends on whether you’re building picket-style (individual boards) or using pre-fab panels.
Picket/board fencing:
Number of pickets = (Total linear feet × 12) ÷ (Picket width + gap width in inches)- Measure your picket width (commonly 5.5″ for standard dog-ear pickets) and decide on gap spacing (0″ for privacy, 1–2″ for semi-privacy/spaced).
- Convert your total fence length to inches, then divide by (picket width + gap).
Example: 196 ft = 2,352 inches. With 5.5″ pickets and 0.5″ gaps (6″ total per picket): 2,352 ÷ 6 = 392 pickets.
Panel fencing:
Number of panels = Total linear feet ÷ Panel width (usually 6 or 8 ft)Round up to the next whole panel, since panels can’t be split lengthwise without extra framing.
Step 5: Calculate Concrete for Post Holes
Each post needs a footing, and concrete is sold by volume, so this step avoids buying too many (or too few) bags.
- Hole depth: generally 1/3 of the post’s above-ground height, plus 6 inches for a gravel drainage base (e.g., a 6 ft fence needs holes roughly 24–30 inches deep).
- Hole diameter: about 3× the post width (a 4×4 post needs a 10–12″ diameter hole).
Formula for concrete volume per hole (cylinder):
Volume (cu ft) = π × (radius²) × depthSubtract the post’s own volume, since it displaces concrete.
In practice, most DIYers just use the coverage chart on the concrete bag: an 80 lb bag typically fills about 0.6 cubic feet, roughly one hole for a standard 4×4 post at 24″ depth. Multiply bags-per-hole × total post count, then add 10% extra for spillage and uneven ground.
Step 6: Add Hardware and Fasteners
Easy to forget, but it adds up:
- Post caps — 1 per post (optional but protects against water damage)
- Screws/nails — roughly 2 per rail-to-post connection, plus 2–3 per picket-to-rail connection
- Brackets/joist hangers — if using a bracket system instead of toe-nailing rails
- Gate hardware — hinges (2–3 per gate), a latch, and possibly a drop rod for double gates
Step 7: Build in a Waste Buffer
Add 10% extra to your picket/panel and lumber counts to cover:
- Cutting errors and defective boards
- Uneven terrain requiring extra trimming
- Future repairs (having a few spare matching boards saves headaches later)
Quick Reference Checklist
| Material | Formula | Round |
|---|---|---|
| Posts | (Linear ft ÷ spacing) + 1 + corners + gates | Up |
| Rails | Sections × rails per section | Up |
| Pickets | (Linear ft × 12) ÷ (width + gap) | Up |
| Panels | Linear ft ÷ panel width | Up |
| Concrete | Bags-per-hole × post count × 1.1 | Up |
| Waste buffer | +10% on lumber/pickets | — |
Final Tip
Once you’ve calculated everything, get a written quote from your supplier and double-check post spacing against your specific fence style’s manufacturer guidelines — wind load, soil type, and local building codes (some areas require permits or specific footing depths) can all shift these numbers