
How to Use a Fence Material Calculator
Planning a fence project involves more than picking a style you like — you need to know exactly how much material to buy so you don’t overspend on excess or run short mid-installation. That’s where a fence material calculator comes in. Whether you’re using an online tool, a spreadsheet, or doing the math by hand, understanding how these calculators work will save you time, money, and multiple trips to the hardware store. This guide walks through exactly how to use one, what inputs you’ll need, and how to double-check the results.
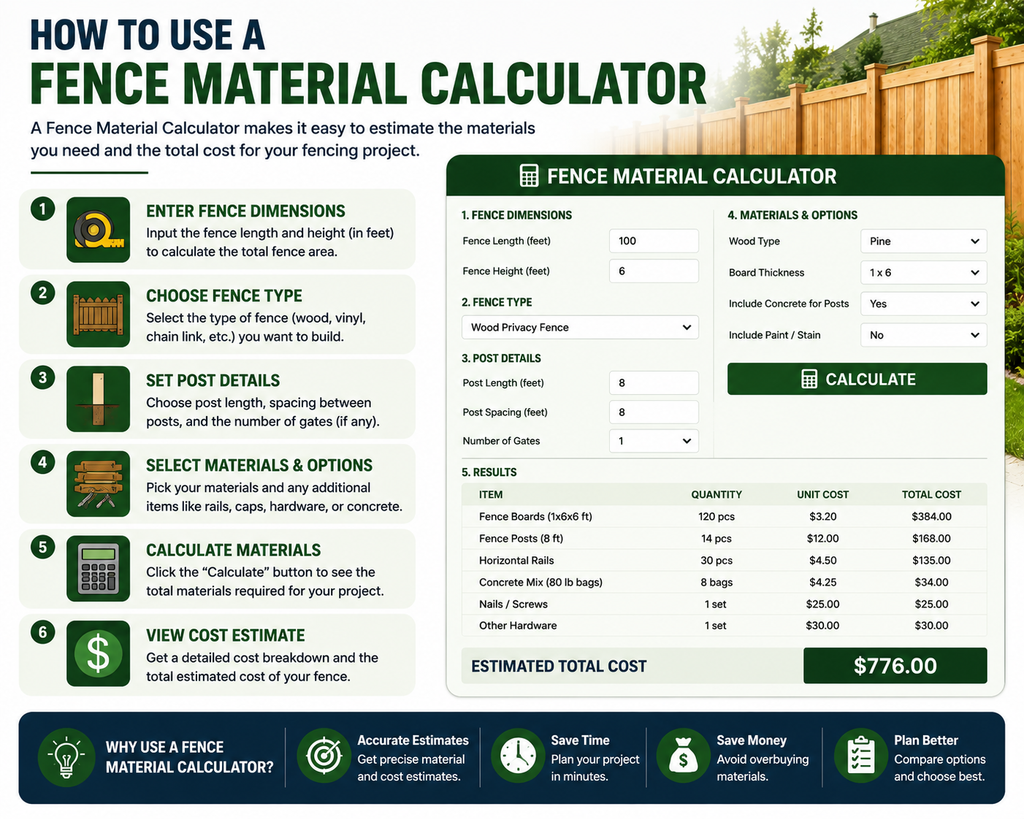
What Is a Fence Material Calculator?
A fence material calculator is a tool — often found on home improvement or lumber retailer websites — that takes basic measurements of your yard or property line and converts them into a materials list. Instead of manually calculating how many posts, rails, and panels you need, the calculator does the math for you based on standard spacing and construction guidelines.
Most calculators will output:
- Number of fence posts
- Number of horizontal rails
- Amount of fencing material (panels, pickets, or rolls)
- Bags of concrete for post-setting
- Number of gates and hardware kits
- Estimated total cost
Gather Your Measurements
Before opening any calculator, walk your property and take these measurements:
- Total linear footage of the fence line (the full perimeter you want enclosed, not the square footage of the yard).
- Number of corners or direction changes, since these affect post placement.
- Desired fence height (commonly 4, 6, or 8 feet).
- Number and width of gates you’ll need.
- Terrain notes — is the ground flat, sloped, or rocky? This won’t go directly into most calculators but will matter later.
Round your linear footage up slightly to account for minor measuring errors, since it’s easier to have a little extra material than to run short.
Choose Your Fence Type and Material
Fence calculators typically ask you to select a fence style, because spacing and material requirements differ significantly:
- Picket or privacy wood fence: Requires posts, rails, and individual pickets or panels.
- Chain link: Requires posts, top rail, tension wire, and rolled mesh fencing.
- Vinyl: Requires posts, rails, and pre-fabricated panels, similar to wood but with different spacing tolerances.
- Split rail or ranch rail: Requires posts with pre-drilled holes and horizontal rails only, no infill.
Selecting the right category ensures the calculator applies the correct spacing formula — for example, wood privacy panels are usually spaced 8 feet apart, while chain link posts might be spaced up to 10 feet apart.
Enter Post Spacing
Post spacing is one of the most important variables in the calculation, since it directly determines how many posts you’ll need. Standard spacing guidelines are:
- Wood fences: 6–8 feet between posts
- Vinyl fences: 6–8 feet between posts (check manufacturer specs, since panel widths vary)
- Chain link: 8–10 feet between posts
- Split rail: 8–10 feet between posts
Most calculators default to a standard spacing, but some let you adjust it manually. If your calculator allows customization, match it to the manufacturer’s recommendation for the specific product you’re buying, since pre-made panels often come in fixed widths that dictate spacing.
Let the Calculator Determine Post Count
Once you’ve entered your linear footage and spacing, the calculator applies this basic formula:
Number of Posts = (Total Linear Footage ÷ Post Spacing) + 1
For example, a 200-foot fence line with 8-foot spacing needs 26 posts (200 ÷ 8 = 25, plus 1 for the starting post). Corner and gate posts are usually counted separately, since they often require heavier-duty posts to handle additional structural load.
Calculate Rails and Panels
After posts, the calculator determines how many horizontal rails or panels you’ll need:
- For panel fencing, it divides total footage by panel width (commonly 6 or 8 feet).
- For rail fencing, it multiplies the number of post sections by the number of rail rows (2-rail, 3-rail, or 4-rail configurations are common).
- For picket fencing, it calculates individual picket count based on picket width and desired spacing between each one.
Add Concrete, Hardware, and Gates
Good calculators also account for the supporting materials:
- Concrete: Typically one 50-lb bag per post for smaller fences, or two bags for taller privacy fences with deeper post holes.
- Post caps and brackets: One per post, plus extra brackets for rail attachment points.
- Gate hardware: Hinges, latches, and posts sized for the gate’s weight and width.
- Fasteners: Screws or nails, usually estimated by the pound based on total panel count.
Review and Adjust the Output
Once the calculator generates your materials list, review it against your own measurements and site conditions:
- Add 5–10% extra material for cutting waste and mistakes.
- Increase post depth (and concrete) if your calculator doesn’t already adjust for regional frost lines.
- Double-check gate post requirements, since these are often undersized in generic calculators.
Get a Cost Estimate
Many calculators will multiply your materials list by current pricing to give you a total cost estimate. Use this as a starting point, then compare it against local supplier pricing, since online calculators often use national average costs that may not reflect your region.
Tips for Getting Accurate Results
- Measure twice. Small errors in linear footage compound quickly across posts, rails, and panels.
- Use manufacturer-specific calculators when possible, since generic tools may not match the exact spacing of the product you’re buying.
- Account for slopes. If your yard has significant grade changes, you may need stepped panels or additional posts, which most basic calculators don’t factor in automatically.
- Save your inputs. If you’re comparing multiple fence styles or heights, record each calculator run so you can compare materials lists side by side.
FAQs
Are fence material calculators accurate? They’re a strong starting point, generally accurate within 5–10%, but they rely on standard spacing assumptions. Always add a small buffer for waste and irregular terrain.
Do I need to know my exact yard dimensions before using a calculator? Yes. Accurate linear footage is the most important input — even small measurement errors can lead to ordering too much or too little material.
Can a calculator account for slopes or uneven ground? Most basic calculators assume flat terrain. For sloped yards, add extra material and consult a contractor or a more advanced calculator designed for stepped or racked installations.
Do fence calculators include labor costs? Some do, but many only estimate materials. Check whether the tool separates material and labor costs, or ask a local contractor for a labor-specific quote.
How much extra material should I buy beyond the calculator’s estimate? A common rule of thumb is 5–10% extra for pickets, panels, and fasteners to cover cutting errors and damaged pieces.
What’s the difference between a general calculator and a manufacturer’s calculator? Manufacturer calculators use the exact panel widths, post spacing, and hardware specs for their specific products, making them more precise than generic online tools.
Final Thoughts
A fence material calculator takes the guesswork out of planning your project, but it works best when you feed it accurate measurements and understand the assumptions behind its formulas. By gathering precise data upfront, choosing the right fence type, and reviewing the output critically, you’ll walk into the hardware store or place your online order with confidence — and avoid the frustration of running short on materials halfway through the job